Replacing your campervan windows can improve insulation, ventilation, and overall aesthetics. Whether you're upgrading for better visibility or replacing a damaged window, this guide will walk you through the campervan window replacement process.
Why Replace Your Campervan Windows?
Before diving into the installation, let’s look at some common reasons for replacing your campervan windows:
- Fixing Leaks or Damage – Windows can crack, leak, or become difficult to open. Installing a new replacement ensures a watertight and secure fit for older models.
- Improving Ventilation – Swapping out a solid fixed window for a sliding or vented van window enhances airflow inside your camper van.
Tools & Materials Needed
To safely remove and install a new campervan window, you’ll need the right tools. A windshield removal kit is essential and typically includes:
- 72 ft. braided steel windshield wire
- Straight hook tool
- 2-piece stainless steel T-handle grips with a sliding wire attachment

Other helpful tools:
- Masking tape
- Suction cup lifter
- Safety gloves
- Metal paint scraper
- New window sealant and primer
- New window
Step-by-Step Guide to Replacing a Campervan Window
Step 1: Remove the Old Window
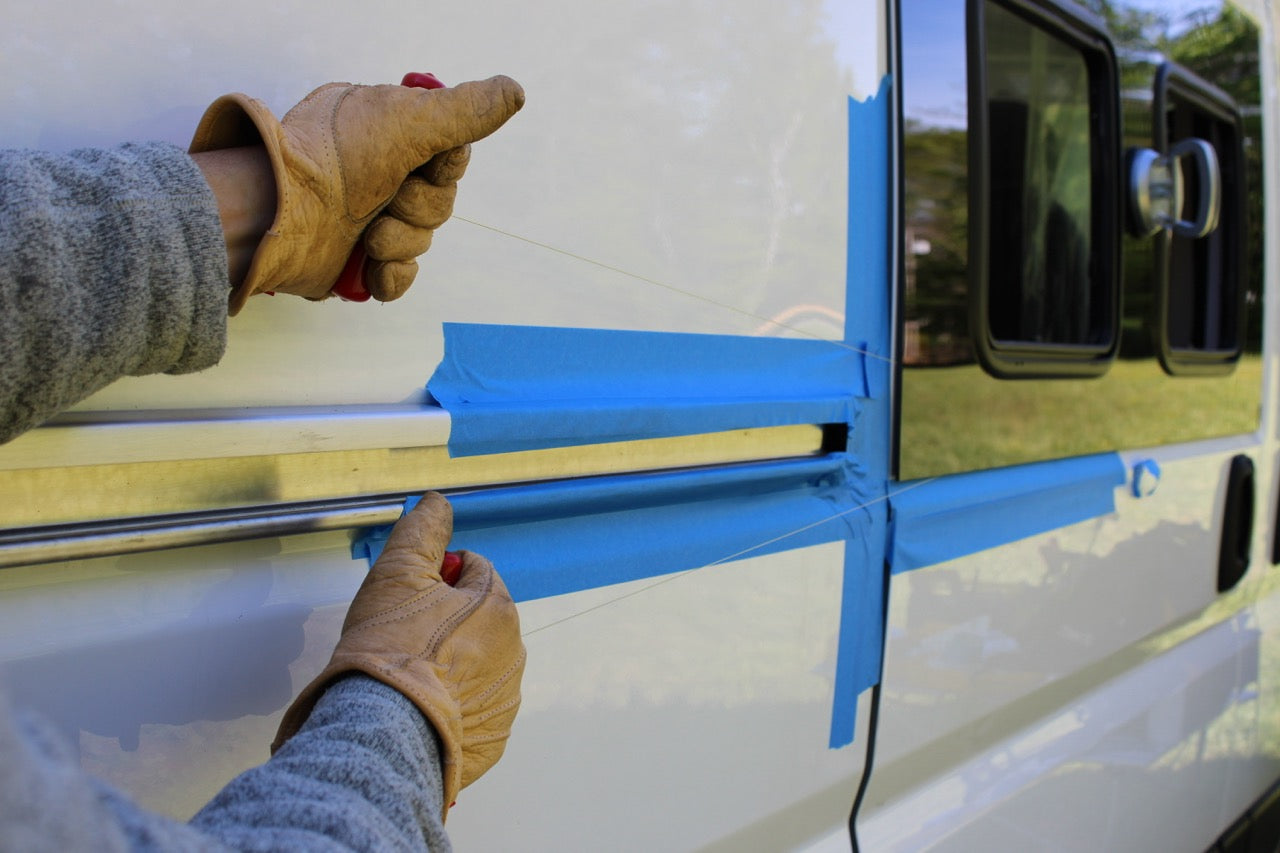
Insert the Hook Tool: Start at the bottom right corner of the window and push the straight hook tool through the adhesive with the braided wire threaded on the end.

Thread the Wire through: Pull the braided steel wire through so that about half the length is on the outside. With the remaining wire end, repeat the process of inserting the threaded hook through the adhesive at the left bottom corner. The wire should wrap the top and bottom of adhesive, allowing the wire to cut through as you pull.
Attach the Wire to T-Handles: Secure both ends of the wire to the T-handle grips for better control.

Cut Through the Adhesive: Holding the T-handles, slowly pull the wire across the bottom of the window, sawing through the adhesive. Tip: be sure to tape and cover the areas around your window where you will be working the wire. You can damage your paint easily if left unprotected.

NOTE: Secure the Window with Masking Tape: Before fully removing it, apply masking tape to prevent sudden shifts or drops.
Repeat Process Along the Top and Sides: Thread one end of the wire through the top right corner and the other end through the top left corner, and pull the wire across the top to cut through adhesive. Next use masking tap to secure the window vertically, and repeat threading the wire through each right and left corner, cutting along both sides to fully detach the window from the van.


Step 2: Remove the Window and Clean the Surface
Gently Tap the Window Out: Use light pressure to loosen the window from the adhesive.
Clean the Surface: Remove leftover adhesive using a razor blade or plastic paint scraper.
.

Step 3: Install the New Campervan Window
Apply Primer + Adhesive: First apply primer following your previous adhesive line. Cover any paint scratches to prevent rust. Once dry, apply a consistent bead of window adhesive around the mounting area. See our bonded van window installation guide for more tips of applying and installing a new window.


Position the New Window: Carefully place the new window into the opening, pressing firmly to ensure a proper seal.
Secure with Tape: Use masking tape to hold the window in place while the adhesive sets.
Let the Adhesive Cure: Follow the manufacturer’s recommended drying time before removing the tape or driving the van.
See our bonded van window installation guide for more tips of applying and installing a new window.

Common Campervan Window Replacement Questions
How long does it take to replace a campervan window?
Most installations take 1-2 hours, depending on experience and adhesive curing time.
Do I need a professional to replace my window?
While a DIY approach is possible, a professional ensures a leak-proof and secure installation. If unsure, consult an expert.
What type of sealant should I use?
Use a high-quality automotive urethane adhesive to ensure a strong, waterproof bond.
Can I replace a solid panel with a vented or sliding window?
Yes! Many camper van owners upgrade to sliding or vented windows for improved airflow and ventilation.

SUMMARY
Replacing a campervan window might seem intimidating, but with the right tools and method, it’s a straightforward DIY project. Whether you’re fixing a leak or upgrading for better insulation, a well-installed window makes a huge difference in comfort and functionality.
Ready to replace your campervan windows? Explore our selection of high-quality replacement windows designed for Sprinter, Transit, and ProMaster vans!